Play interactively with Apache Arrow C++ in xeus-cling
·Often, we use pyarrow in a Jupyter Notebook during work. With the xeus-cling kernel, we can also use the C++ APIs directly in an interactive fashion in Jupyter.
The Jupyter notebook or its newer sibling the Jupyter lab are the tools of the trade if you want to do interactive analysis of data or simply try out some concepts before productionising them. Yet this workflow was mainly limited to Python in my daily life. With the xeus-cling kernel, you can now can also play with C++ code interactively in the same environment. Once configured, it is as easy to use as the Python kernel although you deal with a statically-typed, compiled language.
The compiled attribute of the language is also the point where we need to do some extra work to get a working environment.
To be able to work with Arrow in Cling, we need to ensure that both are build with the same compiler and linked against the same standard library.
This also applies transitively for all C++ dependencies.
As compiler used by conda-forge at the time of writing are too old to be able to build xeus-cling, we will build Arrow and its dependencies with the same compiler as the xeus-cling conda package is built with.
Kindly the people from QuantStack provide a gcc-6 conda package alongside their xeus-cling package.
They also have built some of Arrow’s dependencies with the newer gcc version which we can use.
For the other dependencies, we will use Arrow build toolchain that automatically downloads its dependencies and builds them with the same settings as we use for Arrow.
Build Arrow and Parquet C++ for use with cling
For the build, we will try to follow the instructions from the Arrow Python Development guide as close as possible. As a start, we create a conda environment with all non-C++ dependencies of Arrow and also install Jupyter Lab from conda-forge.
# Create a new conda environment
conda create -n arrow-xeus python=3.6 numpy six setuptools cython pandas \
    pytest cmake rapidjson snappy zlib brotli jemalloc lz4-c zstd ninja \
    jupyterlab -c conda-forge
source activate arrow-xeus
As the next step, we will install the gcc-6 compiler from QuantStack which we will use in the following to build Arrow and its dependencies.
Additionally, we install the boost-cpp build from QuantStack that was already built with gcc-6.
We also set the environment variables CC and CXX so that the new compiler is picked up automatically by the build tools.
conda install gcc-6 boost-cpp -c QuantStack
export CC=${CONDA_PREFIX}/bin/gcc
export CXX=${CONDA_PREFIX}/bin/g++
As the last of the external dependencies, we install the actual interactive environment.
For the C++ support, we install the interactive C++ compiler cling and the C++ kernel for Jupyter Notebook xeus-cling from the QuantStack channel.
Finally, we also need to install Jupyter, here I have chosen the new (and still alpha) JupyterLab frontend.
While it is not yet still a preview, I can highly recommend to evaluate it as it did provide a clear improvement for my Jupyter work.
conda install cling -c QuantStack -c conda-forge
conda install xeus-cling -c QuantStack -c conda-forge
conda install jupyterlab -c conda-forge
With all (pre-built) dependencies installed, we can now start the build of the Arrow artefacts. Therefore, we first need to clone the respective git repositories.
git clone https://github.com/apache/arrow.git
git clone https://github.com/apache/parquet-cpp.git
We now need to make Arrow aware of the already available dependencies in the conda environment.
Normally, we would simply set ARROW_BUILD_TOOLCHAIN and PARQUET_BUILD_TOOLCHAIN for this.
Due to all dependencies being available as compatible packages in any conda channel, we only make the build aware of the package that are pre-built.
The other ones will be built during Arrow’s and Parquet’s cmake-based build process automatically.
export ARROW_BUILD_TYPE=release
export ARROW_HOME=$CONDA_PREFIX
export PARQUET_HOME=$CONDA_PREFIX
export BOOST_ROOT=$CONDA_PREFIX
export SNAPPY_HOME=$CONDA_PREFIX
export JEMALLOC_HOME=$CONDA_PREFIX
export SNAPPY_HOME=$CONDA_PREFIX
export ZLIB_HOME=$CONDA_PREFIX
export BROTLI_HOME=$CONDA_PREFIX
export LZ4_HOME=$CONDA_PREFIX
export ZSTD_HOME=$CONDA_PREFIX
# Normally we don't need to set LD_LIBRARY_PATH as conda will take care of this.
# In the case of cling, we need to make it aware of the libraries in the conda
# environment.
export LD_LIBRARY_PATH=$LD_LIBRARY_PATH:$CONDA_PREFIX/lib
With all the setup done, we can now build Arrow and Parquet C++ with the same commands as the official instructions.
Arrow and Parquet will pick up all dependencies that are installed in the conda environment and will build the ones with gcc-6 that we have not yet installed.
mkdir arrow/cpp/build
pushd arrow/cpp/build
cmake -DCMAKE_BUILD_TYPE=$ARROW_BUILD_TYPE \
      -DCMAKE_INSTALL_PREFIX=$ARROW_HOME \
      -DPTHREAD_LIBRARY=/usr/lib/x86_64-linux-gnu/libpthread.so \
      -DARROW_PYTHON=on \
      -GNinja ..
ninja install
popd

mkdir parquet-cpp/build
pushd parquet-cpp/build
cmake -DCMAKE_BUILD_TYPE=$ARROW_BUILD_TYPE \
      -DCMAKE_INSTALL_PREFIX=$PARQUET_HOME \
      -GNinja ..
ninja install
popd
Use Arrow in Jupyter with xeus-cling
The impatient may grab the notebook from GitHub: Arrow in xeus-cling.ipynb
We can now start developing Arrow C++ interactively in Jupyter.
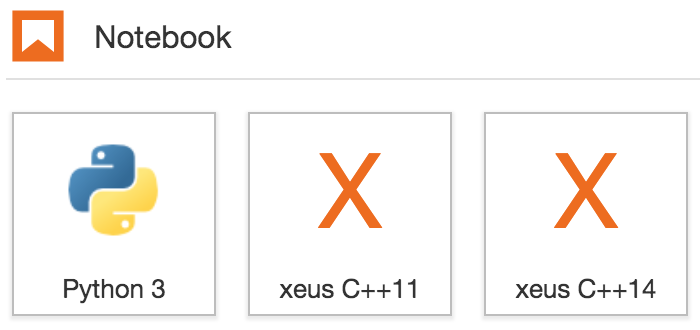
After starting Jupyter Lab with jupyter lab, you should now see two additional kernels: xeus C++11 and xeus C++14.
You can use either of them to use Arrow as it’s based on C++11 but the code is also compatible with C++14.
As the first step in a new C++ notebook, we need to include the Arrow headers and shared library.
You can include headers as usual using the #include preprocessor directive.
For shared libraries, we need to utilise a #pragma to load the shared library into the already running cling process.
Overall, we have the following code to get started with Arrow in our notebook:
#pragma cling load("arrow")
#include <arrow/api.h>

using namespace arrow;
One of the specialities of the Arrow code is that it works with Status codes, not exceptions.
Thus for methods that can fail, we need to check if the status was OK.
In this example, we will only print the error message of the Status object if there is a failure, none otherwise.
As cling is based on clang/llvm, we would otherwise get a compiler warning in the notebook that we have forgot to check the Status object.
void check_status(const arrow::Status& status) {
    if (!status.ok()) {
        std::cerr << status.message() << std::endl;
    }
}
As a simple example of Arrow, we want to build a Table that consists of an integer and a string column with 2 rows.
Such an object could than be later used to be written to a Parquet file or passed to other systems that support Arrow data structures.
The Table will be made up of Array objects containing the data and a Schema instance describing the data types.
For the build of the Array objects, we can use the Builder classes to incrementally construct them.
Int8Builder builder;
check_status(builder.Append(1));
check_status(builder.Append(-1));
std::shared_ptr<Array> i8_array;
check_status(builder.Finish(&i8_array));
StringBuilder str_builder;
check_status(str_builder.Append("test"));
check_status(str_builder.Append("another test"));
std::shared_ptr<Array> str_array;
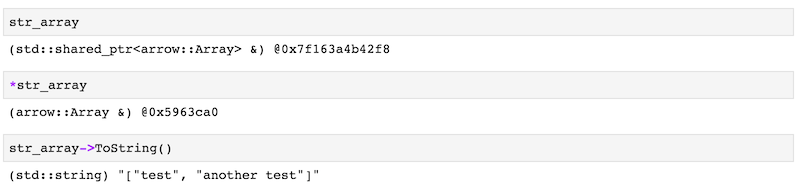
check_status(str_builder.Finish(&str_array));One important part of a notebook environment is that you interactively inspect the objects you have at hand.
While the shared_ptr of an arrow::Array as well as the dereferenced object of it will only show you the memory address of it, you can use the ToString() method on it to view the actual data it contains.
The schema of the table can be constructed by passing a vector of arrow::Field objects to the Schema constructor.
The main information this schema adds to the table is the names that are assigned to each column.
The types of the of the columns should match the types of the arrays that passed in the constructor of Table later on.
While Arrow does not automatically ensure that they match, you can call Table::ValidateColumns to verify the integrity.
auto tbl_schema = arrow::schema({
arrow::field("int_column", int8()),
arrow::field("str_column", utf8())
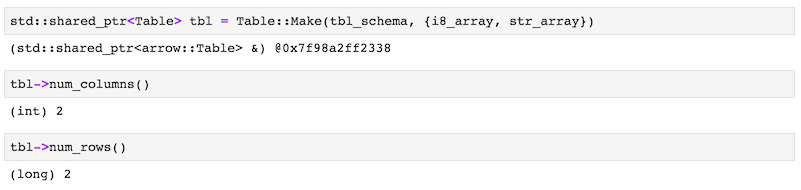
})With schema and arrays constructed, we can now instantiate the Table using Table::Make.
At the end, we verify that it contains the expected amount of two columns and two rows.
Conclusion
With xeus-cling, we can now interactively work with C++ code.
It may not be as comfortable as with Python but it gives us the advantage that we can construct code with a faster feedback cycle than we would normally have where we would need to recompile and run a whole program for a single line of code change.
Currently, you need to jump through many hoops until you can Arrow C++ running within xeus-cling but in the near future, we expect conda-forge to update to the latest Anaconda 5 distribution.
There the default compiler is gcc-7.
Once all the necessary packages are built, most parts of this article should boil down to a simple conda install arrow-cpp xeus-cling.
You can find the Jupyter notebook outlined in this article on Github: Arrow in xeus-cling.ipynb